Friday, October 28, 2011

Crystal Autumn Leaves

Highly decorative Autumn leaves that are perfect for Thanksgiving Decorations! Many leaf shapes that stitch out very quickly! Add ashesive crystal to finish the look! Come on in and find them here!


Thursday, October 27, 2011

Tips and Techniques for Quick and Easy Quilts

Fantastic tips and tricks found at ideasforquilting.com


Tips and Techniques for Quick and Easy Quilts


Before you start your first quilt, take the time to review and enjoy some of the Tips and Techniques to see if maybe there is something that can help save you time or just maybe make things a little bit easier. 

Shortcuts are always helpful in the fast and busy world that we live in.
So just sit back and enjoy your quilting journey. I hope it's a long one.


*** Choose fabrics for your quilt block which have no obvious direction to the pattern. 

An overall non-directional print will give greater flexibility when using rotary cutting and strip piecing techniques.

*** Make the most use of the rotary cutter. This can save you tons of time and you are more accurate with the rotary cutter.
*** Strip piece and cut whenever it is possible.
*** Design your quilt with squares, rectangles and strips. I know the sharp points look great but they also take more time and planning. But the simple lines of squares make a quilt come together very fast.
*** Machine piece, quilt and plan for the least amount of hand work as possible.
*** Select either pure bright colored fabric or soft pastels in prints and solids.
*** Make square or rectangle quilts and avoid irregular outside edges.
*** Cut binding fabric on the grain to get the most from the fabric (cutting on the bias requires more fabric).
*** Select fabric which is washable and color fast. Quilts for a baby or crib quilts usually receive harder use, so a good quality fabric will last longer and looks better.
*** When you are working with smaller quilt pieces and smaller quilt blocks, it doesn’t mean that you can’t get a piece turned upside down or turned the wrong way when you are stitching the pieces together. So always make sure you are sewing the rights sides together.
*** You owe it to yourself to take a break after creating all of your quilt blocks and laying them out. Step back and look at the blocks from a distance. You may want to change the placement of one or two pieces or blocks. This is easy to do before you sew all of the blocks together.
*** Spray starch your fabric before you cut or sew. Starched fabric is very easy to mark, cut and sew. It prevents markers from leaving permanent lines on your fabrics. It helps you to cut accurate straight lines. It also makes sewing extremely easy. Bias edges don’t stretch, tiny pieces aren’t pulled into the needle hole opening and point matches are more accurate.
*** Press seam allowances. Press with care. Do not drag the iron across the piecing. Use a gentle up and down motion to prevent stretching bias edges. Use a warm iron with lots of steam. Press seams as you sew and never stitch across an unpressed seam.
*** Use fine cotton quilting thread , a small machine quilting needle and short stitch length. Thread takes up space in a seam. A thick thread and a large needle can distort a complex multi pieced block. The finer the thread and the smaller the needle that you use, the more accurate your piecing is.
*** Choose the correct pressure foot for the type of piecing. There are two basic presser feet for piecing. For strip piecing and straight seams, use a ¼” straight stitch presser foot. This foot usually has a true ¼” width on the right hand side of the foot. There are many styles available. For more detailed matches, use an open toe or no bridge embroidery presser foot. The bridge or small metal bar, directly in front of the needle hole opening is cut away to give you a clear view of the needle and your sewing, making your matching simpler.   

Wednesday, October 26, 2011

Christmas Craft Project


What a fabulous idea that turned up over at Craftideas.info.  Gingerbread cookies made from cork look just like the real thing!  Go visit for many more projects!

Christmas Craft Projects - Cork Gingerbread DecorationCork has a texture that is perfect for making ornaments that look like baked cookies. This is a second example of how you can decorate a gingerbread man out of cork. You can see the first ornament here. This ornament goes a step further and can be enlarged to use as a wall or window decoration. If using as as window decoration, decorate both sides of the gingerbread man.
Cork Gingerbread Man Ornament 1
For this project you will need:
- thin cork sheet
- craft knife or sharp scissors
- white, red and black dimensional paint
- strong craft wire
- 5 x 8mm wooden red beads
- natural red raffia
- needle
Free Pattern: Gingerbread Man

Instructions:
1. Print the pattern to the size of preference and trace pattern onto the cork and cut the gingerbread man out. If you have the Sizzix Originals Gingerbread Man die cut and the Sizzix Big Shot or Cuttlebug machine, you can create a gingerbread man template out of cardstock to use instead.
2. Decorate the gingerbread man with dimensional paint as seen on the pattern. Let the paint dry.
4. Using a needle, carefully make a hole in each hand of the figure. Do not make the hole too close to the edge.
6. Cut a longer piece of wire and add 5 beads to it. Insert one end of the wire through one hand and bend to secure. Be careful not to pull too strongly on the wire, otherwise the cork could break off. Insert the other end of the wire in the other hand and secure it.
8. Cut pieces of red raffia and tie 5 bows so that there is a bow between each bead.

Tuesday, October 25, 2011

Roasted Broccoli


Roasted broccoli recipe for kids
Roasted Broccoli
Source: Courtesy Amanda Haas

Check out this simple recipe kids seem to go crazy for! Courtesy of Circle of Moms!

Roasted Broccoli

If you think your children don’t like broccoli, try roasting it! Roasting broccoli at a high temperature brings out all of its sweet flavors, so it tastes completely different than if you normally boil or steam it. If you’d like to add more flavor, you can zest a lemon over the top before roasting, or sprinkle good Parmesan cheese over it when it comes out of the oven.

Ingredients

  • 1-1 1/2 lbs broccoli florets, washed, dried & cut in 1" pieces
  • extra virgin olive oil
  • salt
  • freshly ground pepper

Preparation

Preheat the oven to 450 degrees.

Place the broccoli in a mixing bowl and add a few tablespoons of olive oil. Sprinkle with salt and pepper and toss until all the broccoli florets are generously coated with the oil. Spread out on a rimmed baking sheet. Roast until the broccoli is just soft, about 15-20 minutes, stirring every 5 minutes to ensure even cooking.

Note: For a little added heat for the adults, sprinkle 1/2 teaspoon of chili flakes in before roasting.

Friday, October 21, 2011

New at Splinters and Threads

uHOOPit BoxStar
uHOOPit™ Pieced designs are unique embroidery designs.  Perfection can be acheived.  These are foundation pieced blocks made in the embroidery unit.  This set contains step by step pictured instructions.  Zip files include 4", 6", and 8" blocks.


Thursday, October 20, 2011

Easy Craft Projects

Visit Easy Craft Projects to find the latest in the crafting world!  ECP has many projects, in an amazing array of categories, for you to try your hand at.  They have free resources for you to look at, tutorials for the projects you see on the site and new crafting challenges every other Friday!  Come see what you have been missing!


Wednesday, October 19, 2011

Quilts for Kids

Here is a what Quilts for Kids is all about.  After you read this letter you may want to go find out what you can do to help out.  Go to the site to request a quilt kit, read stories and find out how to volunteer.


MISSION STATEMENT:Transforming discontinued, unwanted and other fabrics into patchwork quilts that comfort children with life-threatening illnesses and children of abuse.
A Letter from the Founder
It seems like only yesterday that I discovered a wealth of discontinued fabric samples being thrown away. In those days it never occurred to me that we’d be an International organization today. I was only looking to save some fabric samples from a landfill. I was assured by all my friends and family that this was a dumb idea and no one would make quilts for some stranger’s child…and do it for free! Well, all these years later you have managed to prove these naysayer’s wrong, for you have given from your heart and helped to turn tears into smiles for the tens of thousands of children that you never even knew existed.
In 2007 the majority of fabric mills moved offshore to places like Korea, China & Japan. The US government did not bail them out like they did the auto and banking industry so they left the country.  Those wonderful 18 wheelers loaded with donated fabric are not coming our way any longer and we were forced to either close (NOT an option) or find funding to purchase fabric.
The fabric companies that have always supported us have reduced their prices to enable us to buy fabric so we can stay in business. Discontinued fabric samples will always be kept from landfills, and you have had to become creative in figuring out what to do with the heavy fabric that comes our way…promising not to throw any of it into landfills. Through our partnership with Lutheran World Relief, many of the heavyweight fabrics have become heavy blankets that were sent overseas to orphaned children in developing countries who use them to sleep on. 
EVERY YEAR HERE IS SPECIAL AND WE ARE THANKFUL TO OUR PARTNERS:
P&G AND DOWNY for the Downy Touch of Comfort Program that enabled us to create over 10,000 quilt kits to send to quilters across the country, helping us to turn tears into smiles in many more children.
CHANDRA WILSON OF GREY’S ANATOMY for acting as spokesperson for The Downy Touch of Comfort Program and bringing news of QFK to everyone.
ROBERT KAUFMAN FABRIC COMPANY  for creating a line of 33 fabrics by Amy Schimler to benefit QFK.
WASTE MANAGEMENT  for lending us their conference center for workshops.
DOMINION ENERGY  for providing grants to fund workshops.

ROTARY INTERNATIONAL AND THE ROTARY CLUB OF LANGHORNE, PA
  for matching grants to purchase brightly colored child-friendly fabric to make quilts.
CHILDREN’S MIRACLE NETWORK HOSPITALS for partnering with us and The Downy Touch of Comfort team so we are able to bring comfort to children in CMN hospitals across the country.
CLOTHWORKS TEXTILES for donating a truckload of fabric. 
P&B FABRICS for donating a truckload of fabric.
KATHERINE BELL for featuring Quilts for Kids in her book, Quilting for Peace.
DEBBIE MUMM  for including us in her latest book, I Care with Quilts.
THANK YOU TO ALL THE OTHER COMPANIES AND INDIVIDUALS WHO MAKE A DIFFERENCE IN OUR LIVES ON A DAILY BASIS.  SEE OUR FACT SHEET FOR MORE INFORMATION.
Linda Arye
Founding President
Quilts for Kids, Inc.

Tuesday, October 18, 2011

Great way to eat fish with some great tastes you won't find everyday, and it comes from Weight Watchers!  Tilapia is usually easy to find and quite cheap as well so you can stay on budget while having a fantastic WW meal!

Sauteed Tilapia with Almonds and Cherries
NA

Ingredients

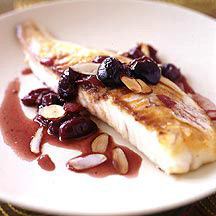
1 Tbsp almonds, sliced   
 1 pound(s) raw tilapia, four 4 oz fillets   
1/4 tsp table salt   
1/4 tsp black pepper, freshly ground   
3 tsp olive oil, extra-virgin, divided   
 1 small onion(s), chopped   
1 fl oz table wine, dry white or dry vermouth (see note)   
 1/2 cup(s) cherries, sweet, pitted, halved   
 1/3 cup(s) vegetable broth, reduced-sodium, fat-free   
1/2 tsp dried thyme   

Instructions

  • Toast the almonds in a large nonstick skillet set over medium-low heat until aromatic and golden, shaking the pan often, about 4 minutes. Transfer to a bowl.
  • Season fish with salt and pepper. Heat 2 teaspoons of oil in the skillet, then add the fish. Cook until firm and lightly browned, about 2 minutes, then flip and cook about 2 more minutes. Remove fish to four serving plates.
  • Heat the remaining teaspoon of oil in the skillet, then add the onion. Cook until softened, about 2 minutes. Add the vermouth or wine; loosen any browned bits of food on the bottom of the pan with a wooden spoon. Cook for 20 seconds, then add the cherries, broth and thyme. Heat until simmering; cook for 30 seconds to reduce slightly. Divide the sauce and toasted almonds among the fish. Serve at once. Yields 1 fillet plus 1/4 of sauce per serving.

Notes

  • Dry vermouth (with a white label) is a gourmet's secret ingredient in countless recipes. It's a fortified wine and can stay open on the shelf for two or three months — unlike white wine which begins to turn within hours of its being opened.

    Substitution Ideas: Can't find tilapia? Try four-ounce sole or flounder fillets.

AQS quilt show in Lancaster, PA

AQS quilt show in Lancaster, PA

I'll be there. Will you be??

I'm SO excited. It will be my first time at Lancaster. Not my first time at an AQS quilt show though. =)

Thursday, October 13, 2011

Time to take a turn off the beaten path and see what you can do to help keep the Earth a little cleaner!  Americans throw away millions of 2 liter bottles every hour of the day, crafters have found a way to turn their bottles into something more useful than trash.  Here are 8 ways to use your bottles!

Wednesday, October 12, 2011

Quilting Tips & Tricks Galore

Want a huge amount of quilting tips and tricks at the click of a mouse? Sure you do! Visit Fons & Porters huge collection of quilting must have tips to find the easy way to do it all! Click here to go right to the good stuff!

"Finger" Pressing

Tuesday, October 11, 2011

Cranberry Upside-down Cake

This just looks scrumptious!  Sweet and tart, this cake is sure to bring some smiles into the world! This recipe is posted over at Smitten Kitchen food blog.  There are so many other recipes that you could be making once you get there.  For now, take a look at how they put this dessert together!


Upside-Down Cranberry-Caramel Cake
Adapted from The Perfect Finish (previously from this book)

If you don’t like molasses, I’d use honey or light corn syrup instead because although just a tablespoon, you can taste it (though we found it delicious against the tart berries). If you’re thinking, as I was, that there was no need for a parchment paper circle in the bottom (and later, top) of the pan, you can probably skip it. The “probably” is there because I didn’t get to retest this without it but see nothing to worry about; if a berry sticks, just scoop it and plop it on top of the cake. The cake itself is a little on the shortcake side — sturdier than your average plush layer cake but still quite moist. Still, if you want a more traditional upside-down cake base, I think this one is phenomenal (you might even swap the pineapple juice for white cranberry) as is this one.
Unsalted butter or cooking spray for the baking pan

2/3 cup (5 ounces or 142 grams) packed light brown sugar
12 tablespoons (1 1/2 sticks, 6 ounces or 171 grams) unsalted butter, melted
1 tablespoon unsulphured molasses
2 cups (8 1/2 ounces or 242 grams) all-purpose flour
1 cup (7 ounces or 198 grams) sugar
2 teaspoons (9 grams) baking powder
1 teaspoon salt
3 large eggs, at room temperature
1 cup (8 1/2 ounces or 242 grams) sour cream
2 cups (8 ounces or 230 grams) fresh or frozen cranberries (you could add a half-cup more, if you, too, can never have enough cranberries)

Optional flavorings: 1/2 teaspoon vanilla extract, 1/4 teaspoon almond extract, 1 tablespoon orange or lemon juice or 1/4 teaspoon zest, 1/4 teaspoon ground cinnamon, few gratings of fresh nutmeg or a combination thereof
Whipped cream, optional
Preheat oven to 375°F. Grease a 9-inch round cake pan with butter and cover the bottom with parchment paper (see Note above). In a medium saucepan over medium heat, combine the brown sugar, 4 tablespoons (1/4 cup) of the melted butter, molasses and 1/4 cup water and bring to a boil. Stir well and pour into prepared cake pan. Set pan aside.
Sift the flour, sugar, baking powder and salt together into a bowl or onto a sheet of waxed paper and set aside. In the bowl of an electric mixture fitted with the whisk attachment (eh, I just used a handmixer with standard beaters) beat the eggs and sour cream together at medium speed until well blended. Add optional flavorings of your choice. Scrape down the bowl and add remaining melted butter (1/2 cup) and beat until combined. Add flour mixture and beat until smooth.
Add the cranberries to the prepared baking pan and gently press the fruit into an even layer. Dollop the batter on top and use an offset spatula to gently nudge it into place without disturbing the cranberries underneath. Bake on the center rack (with a tray underneath to catch drips… just in case; mine did not overflow but came stressfully close) until golden and a tester inserted into just the cake comes out clean, which took 30 to 35 minutes in my oven but is suggested to take 45. Please,please check yours on the early side. Remove from the oven and let cool in pan for 15 minutes. Run a thin knife around the inside of the pan then insert over a flat platter that is (Learn From My Mistakes Alert!) larger than your cake pan, to catch any puddling or jumping cranberries. Remove the parchment paper.
Serve warm, with freshly whipped cream. However, this cake wasn’t half bad two to three days layer, kept covered at room temperature.

Monday, October 10, 2011

A Common Question


The folks over at Embroidery Methods Blog have been asking a question, and now they have an answer and you do too!

What is the difference between Embroidery and Cross Stitch

I have always wondered what the difference is between needlepoint, needlepoint embroidery, and cross stitch. Can you help me out with that, as I have patterns
Permalink -- click for full blog post "What is the difference between Embroidery and Cross Stitch"

Sunday, October 9, 2011

Are you SERIOUS???!!!!

Eating Out part V: How to make a Cherpumple... successfully!: What is a CHERPUMPLE, you ask? Only the most ridiculously fabulous cake/pie dessert ever invented! From the online research prior to my f...

Thursday, October 6, 2011

Take a look at this simple, purse project that gives you all the pockets of a pair of jeans with the large space associated with hand bags.  Found this over at Craftbits.com.  They have many, many other free projects, so if you like this one you will want to be sure to go take a look


From Craftbits
Image for Blue Jeans Denim Bootie Bag Purse DIY Craft Project


Denim Jeans purses or booty bag patterns are all the rage right now with literally 100's of patterns on the market.
We decided to bring you this Booty Bag pattern for free!!!
This bag has the option of being a sewing project or a quick no sew bag by using glue. Glue is a great alternative for a quick kids craft thought it may not be as durable.
Low-rise or small jeans make a smaller bag, bigger or high-waist jeans make for a roomier bag.
Lay the jeans flat and cut off the legs.
Cut through the crotch, then straight across for an even edge.
Turn the jeans inside out and glue the bottom closed leaving about 1/2 inch of fabric (or an even edge). Let the glue dry or alternatively sew this section closed.
Turn inside the right way and check bottom for even edge.
Cut the inside seams from both pant legs and make handles from these. Glue or sew them on.
You can also glue or sew in a cheap bandanna as a lining & add embellishments to decorate the outside of the bag.
Velcro or magnetic closures can also be added.
For extra strength you can SEW this bag closed, but then of course it would not be a quick no sew bag for non sewers.
With craft glue this bag is suitable for carrying around lightweight items or as a overnight bag only.

Wednesday, October 5, 2011

Look at the fabulous Fabric I found while browsing A House Mouse World at Quilting Treasures!  And this is just one of the many fabrics this maker supplies!  Go check out the rest!

Tuesday, October 4, 2011

Somebody Had To Do It

Ever met someone that you were convinced could not boil water?  Well, next time you can print out this humorous recipe from the folks over at Serious Eats.


Boiled Water Recipe

CJ McD asked where my recipe for boiled water went. LOL. That was from the test phase of the new SE Recipes functionality. Anyway, here it is ...
Boiling water is essential to many recipes. If you have never cooked before, don't worry. It is not as difficult as it may appear. This recipe will guide you through the process, even if you have never set foot in a kitchen.
Special equipment: 12-quart stockpot

INGREDIENTS

serves 48, cooking time 5 minutes, total time varies
Water

PROCEDURES

Open your cupboard or wherever it is you store your cookware.
Locate a 12-quart stockpot. If you do not have a 12-quart stockpot, you may use whatever size pot you have; in that event, keep in mind that serving size here is 1 cup and there are 4 cups in a quart. Do the math.
Place your pot in the sink under the tap. If you have never used a sink before, it is the large depression in your counter top. (If you live with someone else, they may have filled it with dirty dishes; in this case, wash them or simply remove them from the sink and place them in the oven — someone else will eventually discover them there and wash them.)
Turn the cold-water knob to the "on" position. Some people (like my dad) prefer to let the water run a little bit. This is optional but encouraged — if it's a hot day or someone has previously used the "hot" water knob, the warmer water will eventually be replaced by truly cold water.
Fill stockpot to within a couple inches of the rim.
Lift stockpot from sink and transfer to stove. (Although appearances may vary, the stove is the thing with 4 or more circular metal bands on top of it; alternately, it may be a completely flat black glass surface. If you are unsure, ask your family, roommate, or neighbor for guidance.)
Find knob on stove that corresponds to the "burner" you have placed your pot on. In addition to words like "Right Front" or "Left Rear," there are usually little pictures near the knobs to indicate position.
Turn knob to "High" and wait until water boils. Depending on strength of your stove and amount of water, the boiling time may vary. Note: DO NOT WATCH THE POT; it will never boil in the event that you do.
Boiled water may be used for any number of applications. Serve hot but do not drink.
Alternate methods
Depending on water application, you may want to salt the water. Do this after the water has come to a boil.
Placing a lid on the pot will help it boil faster, with the additional benefit of blocking water from your line of sight, which, as stated above, inhibits the boiling process.

Monday, October 3, 2011

Serious Eats

If you think of yourself as a Foodie you have got to go take a look at Serious Eats, a food blog where you can find out where to get the best pizza, have access to great recipes and all the latest news in the food world!  This photo is from an article about the 25 best foods at the current Texas State Fair!

Sunday, October 2, 2011

EQ Advent Calendar

This advent calendar is wonderful.  No better time to start than NOW on getting your Christmas projects together.

Saturday, October 1, 2011

AQS Quilters Flash Mob Video

As many of you know, I just returned from vending at AQS Quilt Show in Des Moines, Iowa. What a FABULOUS show! Thank you to everyone who stopped by my booth. I'll be posting links and pictures from the various parts of the show over the next week. I hate to admit that I did miss seeing this, because I was in my booth, but I wanted to share the fun with all of you.