Monday, August 29, 2011

Fun with Robinson Quilts

     Look what we found!  Robin Quilts etc. has a whole section dedicated to video tutorials and the patterns that go with them, and they are available for free!  Go on over and check it out!  Fun projects for great items!


Friday, August 26, 2011

Kindle Giveaway!!

Make purchase between now and Sept 9 and you will be entered to win a 
FREE
Kindle E-Reader!!

Here's how it will work.  Spend $20 you will receive 1 entry.
Spend $35 and you will have TWO entries.
**PLEASE NOTE:: (must be on a single order, not accumative)
At the end of the time period, I will use the Random Number Generator to pick a number


Thursday, August 25, 2011

Tips and Tricks for Machine Quilting


Check out this fabulous article we found over at Dummies.com by Cheryl Fall.  Dummies has how to articles on just about everything.  See what you can find!


Machine Quilting Tips and Tricks

If you have chosen to machine quilt your project, you need to prepare your machine for the chore at hand. Each machine quilting technique requires a different type of presser foot and machine setting, so read through the following information carefully.
If you have pin basted your quilt together, you must remove the safety pins as you approach them. Do not, under any circumstances, attempt to stitch over a safety pin. Not only does stitching over them make them difficult to remove, but it's dangerous! You could easily break your needle, sending a fragment of the needle into your eye.

Preparing large-size projects

If you are quilting a large project, such as a bed quilt, be sure you have a large surface to the rear and to the left of your machine to help you support the weight of the quilt. These large-size projects are very heavy and can easily pull your machine right off the table and onto the floor!
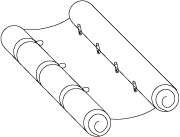
Prepare any quilt larger than 36 inches x 36 inches for quilting by rolling it as follows.
Lay the basted quilt on the floor and roll the two sides towards the center, leaving a 12-inch swath of quilt unrolled, as shown in Figure 1. This is where you will begin machine quilting. Secure the rolls with safety pins or bicycle clips.

Figure 1: Rolling and securing the quilt.
You can find bicycle clips at the sporting goods store and at some quilting stores. Bicycle clips are flexible metal rings with a small opening. They hold your pants leg against your body while cycling so that your pants don't get caught in the bicycle chain.
Bicycle clips function the same way on a quilt. Just think of the rolled edges of the quilt as the "leg" and put the clip over this rolled leg, holding it securely in place.

Using straight-line quilting for the beginner

Straight-line quilting is the easiest form of machine quilting. The results are always good, and it's quick, too!
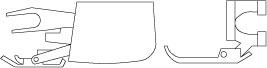
Begin by inserting an even-feed presser foot in your machine, as shown in Figure 2. These presser feet are also known as walking feet. If your machine did not come with an even-feed foot, make a trip to the sewing center to get one. Bring your machine's manual with you so the clerk can help you find the right foot for your model.

Figure 2: An even-feed foot on the left, compared to a regular foot on the right.
An even-feed foot makes machine quilting smoother and pucker-free because it feeds the layers of the quilt through the machine evenly. Without it, the feed dogs (those teeth under the needle) will only feed the bottom layer of fabric through the machine, leaving the batting and top layers open to puckering because they're not being fed through the machine at the same rate.
To start machine stitching:
1. Thread the top of the machine with a coordinating shade of all-purpose thread.
If you would like the stitching to be invisible, use clear nylon monofilament as your top thread.
2. Load the bobbin with all-purpose thread in a color to match or coordinate with your backing fabric.
3. Set the stitch length on the machine at 6 to 10 stitches per inch.
4. Place the unrolled center area of the quilt in the machine and take one stitch.
5. With the needle up, stop and raise the presser foot. Pull the top thread tail so that the bobbin thread tail comes up through the hole in the stitch you made in Step 4.
You now have both tails on top of the quilt.
6. Lower the presser foot and begin stitching by taking two stitches and then stopping.
7. Put your machine in reverse and take two stitches backward to secure the thread.
You are now ready to stitch your quilt.
8. Continue stitching normally (without reversing) along your marked lines, in-the-ditch, or however you have decided to quilt your project.
9. When you get to a corner that needs to be turned, lower the needle into the fabric and raise the presser foot. Pivot the quilt in the other direction and lower the presser foot again. Continue stitching.
10. When you reach a spot where you need to stop stitching, take two stitches backward to secure the thread, just as in Step 7.
Remember, you need to secure the thread at the beginning and end every time, or you run the risk of the stitching coming undone at these starting and stopping points, resulting in an unsightly 1/4 inch or so that is unstitched.
After you finish quilting the area you unrolled, remove the project from the machine and unroll the sides to expose an unquilted area. Continue stitching until you have quilted the entire quilt.

Choosing free-motion machine quilting for advanced projects

Free-motion machine quilting requires some practice to master, but the following description will give you a brief introduction. Plenty of books are available devoted entirely to this subject.
Free-motion quilting is beautiful for fancy quilting patterns, with decorative possibilities limited only by your imagination. You can use it to create graceful curved designs and floral patterns, as well as the basis for stipple quilting by machine.
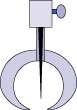
To do free-motion quilting, you need a special presser foot called a darning or free-motion foot. This type of foot has a rounded toe that travels just above the surface of the fabric, as shown in Figure 3.

Figure 3: A darning foot for free-motion quilting.
Because you feed the quilt through the machine manually, free-motion quilting requires you to disengage your machine's feed dogs:
  • On some machines, you disengage the feed dogs by turning a knob, which lowers them out of position.
  • On other machines (especially older models), you don't lower the feed dogs to disengage them. Instead, you cover them with a metal or plastic plate. You will find this plate in your machine's bag of tricks.
Refer to your machine's manual to see how yours works.
With free-motion quilting, you do not need to adjust the length of the straight-stitch on your machine at all. The speed at which you are sewing combined with the speed at which you move the quilt around under the needle determines the stitch length. This is why practice is so important before attempting a large project in free-motion quilting.
After inserting the darning foot and disengaging the feed dogs, thread your machine and bobbin as you would for straight-line quilting. Place the quilt under the presser foot with one hand positioned on each side of the quilt, 2 inches or so from the presser foot. Use your hands to guide the quilt in the necessary direction under the darning foot.
If your fingers feel dry, or if you are having trouble moving the quilt under the machine because your fingers are sliding on the fabric, cover the first and index finger of each hand (four fingers in all) with a rubber fingertip from the office supply store.
Slowly begin stitching, taking two or three stitches in the same spot to secure the thread at the beginning. As you stitch, move the quilt, guiding it with your two hands, so that the needle follows your marked quilting lines or designs. Keeping the machine at a steady speed, move the fabric slowly and smoothly so you don't end up with gaps or overly long stitches. Slow and steady is the key here!
Free-motion machine quilting takes some time to master. Start on small projects, such as pillows, placemats, or wallhangings, before progressing to larger projects. Stipple quilting is a great first-time use for free-motion quilting because you are not required to follow a set pattern. Instead, you learn to maneuver the project under the darning foot and get some much-needed experience.

Wednesday, August 24, 2011

Vision Boards

Take a look at these artistic collages, and learn how to make them!  The folks over at Craft Ideas Weekly have tons of other projects too! Very fun site!

An Example Of A Free Form Vision Board

Tuesday, August 23, 2011

Wonderful Low Cal PB Pie!

Take a look at this mouthwatering recipe featured at Food Network's Hungry Girl blog!


OMG, PB!
It's hard for us to express in words how amazing this dessert is -- any accurate depiction would need tap-dancing unicorns and a 20-minute fireworks show. You're gonna have to make it and taste for yourself. Cue the unicorns...

Ingredients:
1/2 cup reduced-fat creamy peanut butter, room temperature
Half an 8-oz. tub fat-free cream cheese, room temperature
1/4 cup powdered sugar
1/2 cup light vanilla soymilk (or Unsweetened Vanilla Almond Breeze)
1 cup Cool Whip Free, thawed
2 sheets (8 crackers) low-fat honey graham crackers, crushed
Optional topping: Fat Free Reddi-wip

Directions:
Place peanut butter and cream cheese in a large bowl. Using an electric hand mixer set to medium speed, mix until smooth and uniform.

Add powdered sugar to the bowl. Set the mixer to low speed, and mix well. Add soymilk and continue to mix until smooth.

Gently fold in whipped topping, until uniform in color.

Carefully transfer the filling into a pie pan. Evenly top with crushed graham crackers. Cover and freeze until firm, at least 2 hours.

Cut into 8 slices and, if you like, top with Reddi-wip. Enjoy!

MAKES 8 SERVINGS

HG Tip: If frozen until solid, let pie sit at room temperature for 10 - 15 minutes before cutting and serving.

Serving Size: 1 slice (1/8th of recipe)
Calories: 159
Fat: 6.5g
Sodium: 235mg
Carbs: 18g
Fiber: 1g
Sugars: 8.5g
Protein: 7g

PointsPlus® value 4*

Monday, August 22, 2011

Felt Fortune Cookies

Great little video on how to make fortune cookies for all you crafters out there!  Factory Direct Craft put out this video just so you could learn to make these fun treats that you can even stuff with candies!

Thursday, August 18, 2011

Laser Cut Quick Quilts

Take a peek at these incredible quilting solutions.  You can easily create gorgeous quilts using the fusible laser cut appliques!  The come with a fusible backing to make sure they come out perfect every time, and the laser cuts with such precision that the details can be amazing!

Fantasy Floral Laser Cut Kitty and Flowers Applique or Kit Laser Cut Heart Cross Applique or Kit

Could you imagine fabric art like this decorating your home?  Simply beautiful!

Check them out here!

Wednesday, August 17, 2011

Embroidery Decor

Wall hangings are definitely a known way to display your embroidery art, but take a look at just how well embroidery can work when arranged with an idea in mind.

Notice that this person left the hand embroidery in the hoops and hung them on the wall.  Being next to a favorite  cup and saucer collection really helps to pull this room together.  Have you thought of hanging your framed embroidery next to your favorite collection.  With little effort you could have your embroidery decor match your collection!  A lovely way to spend a weekend, and have it stay with you for as long as you like!

Tuesday, August 16, 2011

Food for the Imagination

We all eat with our eyes first, especially children.  If it looks good, or fun to eat, chances are we will try it!  If you have a problem getting your child to eat anything new try this fun food idea.

Cut up some hot dogs and push your dry spaghetti nearly all the way through the dog.  Boil the pieces as you would noodles and scoop gently from water.  Serve plain, with butter, or with your favorite spaghetti sauce!  Come up with a fun name for the kids to associate with the meal and watch it disappear! Hot dog jigglers?  Jelly fish bites?  Possibilities are endless!

Friday, August 12, 2011

Vintage Kitchen Designs

Fabulous kitchen towel and wash cloth designs. Each design depicts specific dishes in a bubbly sink! Cross stitched text denotes the designs and are a fun way to give these some vintage charm! Come on in and take a look!


Thursday, August 11, 2011

How To Stitch With Mylar

Found this tutorial video at youtube!  Great little tutorial for learning the basics of Mylar in embroidery stitchout.  Your machine is probably different so keep that in mind as you watch!

Wednesday, August 10, 2011

Do you follow the rules!?


Monogramming has been around, in one form or another, for quiet some time.  In the late 1800s thru the early 1900s rules for the layout, of the three letter monogram, were created.  The initials were laid out as such.

The initial on the left is the first name.  On the right, the middle initial, and in the center, the initial for the last name.

Now, like most things that have been around a while, some of those rules are changing.  In order to attempt to an idea on what those rules are now, www.EmbroideryArt.com conducted a focus group of monogrammers to find out how they believe it should be done today.

You can read the results of that focus group, and some thoughts from those that conducted the test, right here!

See if your beliefs match up with the majority!

Tuesday, August 9, 2011

Do you get tension headaches?


Superior Threads
 

Do You Get Tension Headaches?

Do you get tension headaches? I’m not talking about headaches you get from the stress of airline flight delays or not being as smart as your smart phone, but the specific misery that comes from not being able to machine quilt with perfect—or even just acceptable—consistent tension.

Monday, August 8, 2011

Crafty Cupboards

What a great way to put some crafting skills to work for you!  By painting the inside panels of your cabinet you can keep track of the week's menu and grocery list, or perhaps a recipe for guidance as you prepare your meals.  The paint is available at nearly any hardware store.

Have fun with the project as well! decorate to your hearts content and look upon your work with love at every mealtime!

Friday, August 5, 2011

Micro-Tip Embroidery Snips

If you do a lot of embroidery this is a must have piece of equipment!
Micro-Tip Embroidery Snips


• Fine stainless steel blades ideal for embroidery work.
• Ergonomic handles made of resistant PP for super-smooth cutting action.
• Curved blades for cutting close to any stitching without harm to clothes.
• Suitable for both right-handed or left-handed user.


On Sale Now for $16!  Purchase Here!

Thursday, August 4, 2011

Amazing Quilts at an amazing Blog

You may not have ever heard of Craft Sanity before, but you should definitely go check them out when you finish here.  Check out these amazing quilts they took photos of when they attended a quilt show where Sharon Schamber  talked about her quilts!  I got to meet her this past Sunday and seeing her quilts in person is amazing! If you have never seen quilts like this before you are in for a special treat!

s5.jpg

Wednesday, August 3, 2011

A Brief History of Chinese Silk

     Though silk is now manufactured in many lands, silk manufacturing originated in China.  As one of the oldest fibers known, the history of illustrious silk is a tale of legend.

     An ancient & well known Chinese legend tells us that Empress Hsi Ling Shi, wife of the Yellow Emperor Huang Ti, accidentally discovered silk as a weaveable fiber, while sipping tea one day, of all things.

     Quite simply, the Empress was enjoying her tea, beneath a mulberry tree, when a silk worm cocoon fell from a branch, plopping into her cup...at which point it began to unravel shimmery threads!  Just imagine something as exciting as this happening to you!  Wow!

     Likewise, the Empress was so fascinated with what she was beholding, she investigated and discovered the source of the cocoon; This happened to be the Bombyx Mori Silkworm, often found in white mulberry trees.

     That was the beginning of the great adventure of silk!  The Empress soon developed sericulture (silk worm farming) and thereafter invented the reel and loom.

     Such a charming legend, which may or may not be what *actually* happened...I think I prefer to think it's EXACTLY how it happened.  I LOVE this legend!

     One thing is certain!  The earliest surviving examples and references to the discovery and use of silk, is placed as far back as 3,000 years ago, to it's birth in China.

     How did silk come to the western world?...ahhhh... 'tis another story for another day...until then...be well...and happy stitching.

Tuesday, August 2, 2011

5 Star Hawaiian Kobobs

Wow do these kabobs look absolutely wonderful, and with rave reviews at Food.com you can be sure that they will tickle a taste bud or two!

Hawaiian Chicken Kabobs. Photo by * Pamela *

Ingredients:

1 1/2 lbs boneless chicken breasts, cut into 1 inch cubes
1 (15 1/4 ounce) can unsweetened pineapple chunks
1/2 cup soy sauce
1/4 cup vegetable oil
1 tablespoon brown sugar
1 teaspoon garlic powder
2 teaspoons ground ginger
1 teaspoon dry mustard
1/4 teaspoon fresh ground pepper
1 large green pepper, 1 inch pieces
12 medium mushrooms
18 cherry tomatoes
hot cooked rice

Directions:

Prep Time: 12 mins
Total Time: 32 mins

1 Put chicken in large shallow dish.
2 Drain pineapple, keep 1/2 cup juice.
3 Set pineapple aside.
4 Mix juice with the next 7 ingredients in small pan.
5 Bring to a boil.
6 Reduce heat and simmer for 5 minutes.
7 Pour over chicken.
8 Cover and chill for 1 hour.
9 Remove chicken from marinade, reserve marinade.
10 Alternate chicken, pineapple, green pepper, mushrooms, and tomatoes on skewers.
11 Grill kabobs over hot coals 20 minutes or until chicken is done.
12 Turn and baste frequently with marinade.
13 Serve over hot rice.

Monday, August 1, 2011

Extreme Crafting: Yarn Bombing

It might sound crazy to some people, but yarn has been sent underground where it is knitted and crocheted to anything and everything as an easily removable graffiti.  Every thing from parking meters to trees are wearing brand new color sweaters!  Go take a look at a few of the things people are covering in yarn here at the In the Berry Patch blog!

image13 yarn-bombing-21